Showing posts with label Terrain. Show all posts

Thursday, 28 March 2024

Creating Bacon Field the Home of the Pig Tickler Tournament

Well now that I have the miniatures for a Pig Tickler Tournament I will be needing a play field. The rules say you should go with a 60cm diameter 'oval' or 'square' area but anything really goes! Being a 'Pig Stickler' for detail I have decided to go with the 60cm diameter circle for the play field!

A period photograph of Pig Ticklers in 'the thick of it' on the hallowed grounds of Bacon Field!

Okay so first thing I made up a quarter circle template which I though I'd then trace with chalk a circle on my green felt mat but then I had a light bulb moment...I had seen while researching the Pig Tickler rules another player make some cricket sight screens presuming the game would be played on cricket ovals for his games, definitely an idea worthy of using!

I then proceeded to build two sight screens and a cricket looking scoreboard the old fashioned small ground type where the basic writing was intrinsic to the score board and panels would be hung showing players names and scores. Now for the boundary a picket fence would be the go but no matter how much I like scratch building putting together around 1.8 metres of picket fencing that needed to curve was not my idea of fun so over to eBay I went! Soon I had sourced some suitable 'fantasy toy model fencing' that would suit and an order was placed!

First up sight screens; these were easy I cut a rectangular piece of 2mm styrene plastic and scored in panel lines and then with 40 grit sandpaper scratched in a wood grain. Two simple triangular supports with bases were glued to the bottom corners and hey presto they were complete!


Then to the scoreboard; for this I used a similar construction method to my Wild West Town (see the TSOG Blog). I made up two rectangular 'boxes' one slightly larger than the other to be a base and the top one including a raised front for the oval's name. I used 2mm styrene plastic for these components. Edging for the top part was created with 0.5mm styrene plastic strips and the base was scored to give a planking look, the whole lot was sanded to again give a wood grain effect. Stencils were used as a guide to the permanent writing on the score board and the Pig Ticklers names and their scores were printed on thick white paper and then taped on, the brighter colour hopefully makes them look like added panels (not sure that works except for people who have seen such score boards before and know how the freshly painted panels stand out against the old weathered scoreboard itself). The name Bacon Field was selected by Mrs Darling from a selection of five I gave her, maybe it sounds a little more Baseball like than Cricket like (eg the famous Wrigley Field) but it flows and is very relevant to the 'sport' being played! So now the score board was ready to go!


In the meantime my picket fencing had arrived!


Lets put it all together...


Lovely set up even if I do say so myself!

Below a pair of Pig Ticklers ready for Battle!

Next Time: More on the Pig Tickler Tournament or maybe a the Russians are Coming AAR, yes I have one ready to type up!

Tuesday, 14 December 2021

Jungle Cuisine, Explorer Broth - Scratch Building an Explorer in a Cooking Pot!

The final preparation work for the Land of the Lost game is done. The scenario needed one more specialty plot piece that required scratch building, 'the lost explorer in a Native Cooking Pot! Surprisingly I couldn't find a commercial one available but I don't mind pottering (pun haha) around anyway and putting something together myself. Here's the result...

Anyone for Wayward White Explorer Broth?

Explorer Broth ingredients;
Milliput
Wire
Twigs
Sheet styrene
An old figure, preferably with a sun helmet

Again I just created this on the go so here's the steps I followed!

1. Mix up a large blob of Milliput.
2. Roll most of this blob it into a ball, then elongate the ball rolling it so you get a cylinder with rounded ends, flatten one end, this will bulge that end and this will be the bottom of the pot, put your thumb into the other end and with a wet finger slowly work a lip between your thumb and finger, once flared and thinned and it looks like the top of a cooking pot smooth the surfaces and set aside.
3. Cut about a 35mm piece of sheet styrene and with the rest of the Milliput create a donut bigger than the pot diameter, flatten it and then add broken twigs to it to represent fire logs.
4. Push the cooking pot carefully onto the bases 'logs' to form an indent in it so it will sit level on the base later.
5. Form a piece of wire into a handle, at each end bend the wire at right angles and press into the cooking pot, let the pot set a bit first so you don't deform it. You could let it dry completely and drill small holes for the wire to fit into, I did it while it was still soft to save drilling.
6. When dry glue the cooking pot to the base and paint as desired.
7. Create a torso to fit in the cooking pot. I used a Warlord German Tank Commander and cut the head off as a base for the explorer, I then added a sun helmeted head left over from an Empress Miniatures vehicle. Add paint as desired!
8. When the cooking pot and figure are dry pour superglue into the cooking pot creating a pool and fit the torso into the centre of the 'puddle', I would recommend test fitting the torso and get it set up right to be level before pouring the superglue! There you're done!

This is the only 'in progress picture' I took, this is the end of step 6 above...

Dr Livingston on the boil!

A view from above, the liquid effect was simply done by creating a puddle...okay pool as it sounds cooler of superglue and then plunging Dr Livingston's torso into it!

Dr Livingston 'in the pot' and 'saved by the explorers'...hmmm not an exact match as he's grown a moustache to twirl out of the pot! Never fear dear reader it won't matter on the night!

Next Time; Most probably the land of the Lost AAR!

Sunday, 12 December 2021

Scenery - Rope Bridges & A How to Scratch Build Them!

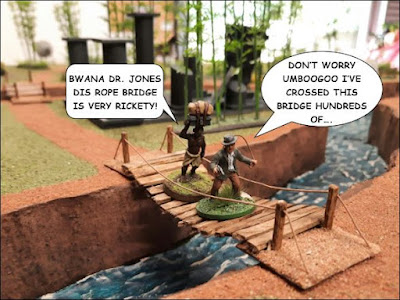
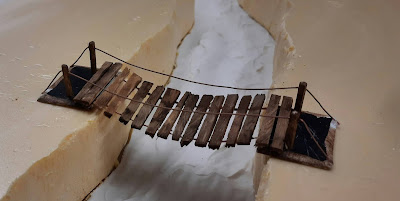
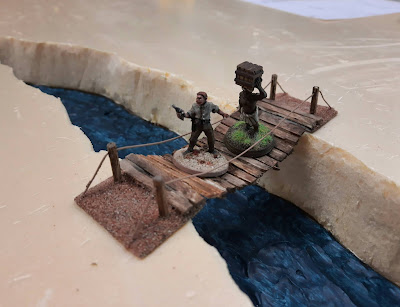
The upcoming Land of the Lost game requires several ubiquitous bits of specific Jungle Terrain the most iconic being 'rope bridges'! I need three for the game so how to make these suckers? I just went ahead and started making the first one and worked it out as I went.


The 'How To'...

I didn't take pictures as I went  (DOH!) so added what I have where they're relevant!

1. Cut from sheet styrene two anchor points, make them the width of your bridge and them around twice the width measurement again for the depth.
2. Strip some electrical wire to bare the copper strands.
3. Cut 4 bits of the copper wire to the length required, i.e. the span of the bridge (allow for some sag) plus about an extra  centimetre extra.
4. Twist the lengths into two pairs.
5 Superglue the lengths to you bridge supports from step 1.

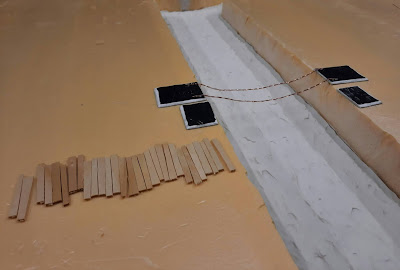
This picture shows the rope bridge at the end of step 5 and in the foreground are the roughly cut slats from step 6!

6. Cut out uneven slats for your bridge and the superglue them onto your 'ropes', I used pop sticks, ice cream stick, coffee stirrers whatever they're called in your neck of the woods.
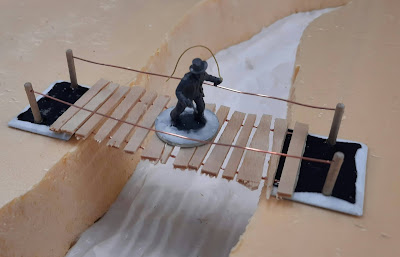
7. From a wood coffee skewer cut four lengths, drill a 0.5mm hole in each just down from the top and glue them onto your bridge supports from step 1 in line and near the end of your main ropes/slats. I drilled a hole into the support base and glued them into there for extra strength.

This picture shows my first attempt at the supports I cut the hand guide rope too short though as it should feed through the skewer uprights and then anchor onto the support base, a later pic will show that!

8. Cut two long lengths of the copper wire for the hand guide rope, feed them between the skewer support posts and anchor them at the back edge of the support base with superglue.

See here the hand guide ropes should look, sorry painting has already started.

9 Paint as desired and you're done!

Looks great (even if I do say so myself)!

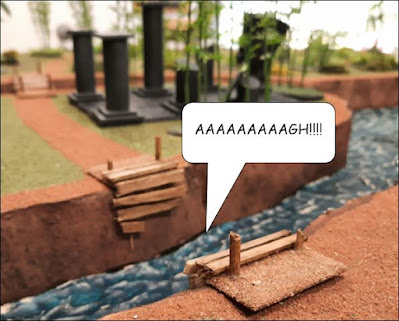
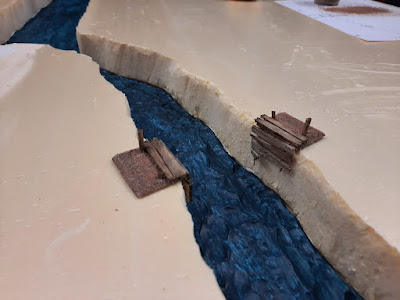
For game purposes, as you would expect there is a chance these rope bridges will break causing the Scenario Characters on said bridge to fall into the crocodile infested river at the bottom of the deep ravine I had to make a broken bridge. It used the same basic process as above...

So there you go advanced rope bridge making covered, hope it may be of help!

Next Time; Explorer Broth!

Thursday, 10 October 2019

The ‘Affair of the Long Lost but Now Found Pyramid of Dloser' - Includes the Making of a 1/56 Pyramid!


During June 1877 the northern Egyptian plains experienced the worst sand storms in living memory. On the morning of the 30th thanks to the shifting sands a small group of lowly Arab camel herders were surprised to see the ghostly image of the apex of an ancient pyramid emerging from the dunes. It was the long lost Pyramid of Dloser last resting place of the Pharaoh Butwejustmet that had been revealed by the fierce winds (insert dramatic music). One of the scruffy camel herders with a decidedly European complexion and displaying amazing British spunk inquisitively approached the edifice...

Later that very same day at S.O.E. (Stealthy Overseas Executive) Headquarters in London...while the Head of Operations was enjoying his afternoon cup of tea and slice of lemon cake a junior secretary looking rather bothered burst into his office. "Sir, an important Marconi message has arrived from Agent Edward Bigger in Egypt...” and after a short pause to catch his breath he continued, “while he has been there acting for us in the guise of an unassuming Arab Travelling Camel Salesman he has come into the possession of vital information! The long lost Pyramid of Dloser has been discovered!” He handed over the missive. After briefly glancing at the contents of Agent Bigger’s communication the Head of Operations roared, “By God Man summon Captain Darling and Professor Tangent immediately this is just the break we’ve been waiting for, we are now one step ahead of that Evil Genius Doctor Von Hades! We must organise an expedition to the Dark Continent post haste...”

So began the ‘Affair of the Long Lost but Now Found Pyramid of Dloser’...

The  Pyramid of Dloser can just be made out in this the first photograph taken of it by S.O.E. Agent Edward Bigger.

Okay so there you have it another 'Pulpy Search' Scenario in the making! Now what do you need when your scenario is based in Egypt and specifically around an ancient Egyptian Pyramid? Well an ancient Egyptian Pyramid of course! Okay off to the workbench Robin! Now I didn’t take any WIP pictures of this quick and nasty project but I can give you an outline of what happened! I started out with a piece of Masonite, a whole batch of foam packing bits in various cuboid shapes, a tube of gap filler and some old house paint. I simply glued the foam blocks together roughly on a piece of Masonite then let the gap filler dry overnight. I then painted the lot and added some sand to the edge of the base...nice and simple. I didn't overdo it as this will probably be a once of use item!

The starting point!

The finished product...I've include  my S.O.E. Agent Edward Bigger figure (1/56) so you can judge the size of this 'edifice'...

Some of the details; the pyramid has a hidden doorway...

...which leads to the secret burial chamber! 

Well they don't build them like that any more (thankfully!)...

Not sure when we'll get to play this scenario but I'll get the background blurb and the OOB up in a post soon. I suspect it will turn out to be the FUBAR VSF Christmas game for the year! Now I gotta work out a Christmas twist...DOH!

Next Time...Hmmm maybe more about The ‘Affair of the Long Lost but Now Found Pyramid of Dloser'...

Monday, 11 March 2019

Scratch Built 'Redoubt'...

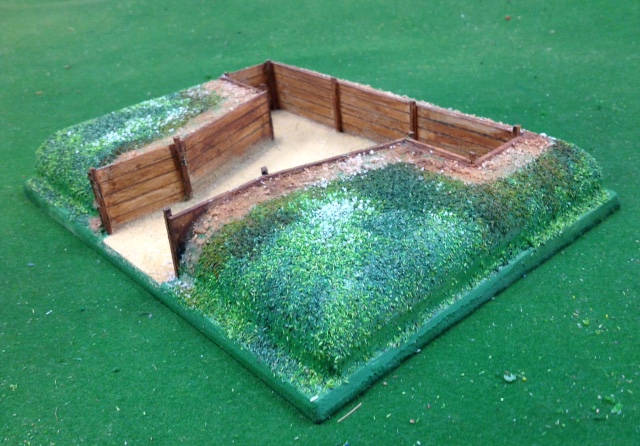
Well for 'The Big Gun' scenario I needed a 'redoubt' for the Russian Gorlov Gun.


Here's what I came up with complete with Russians!

It was a simple build using the below;
- Lid of a Ferrero Rocher Chocolates box
- MDF sheet
- Styrene sheet
- Matchsticks
- Flocking stuff
- Glues and paint

So I cut my trench design into the clear plastic chocolate box lid and glued it to an MDF base. Then I cut some styrene sheet to create the interior wood lining (it was scored and lightly sanded to create planks and wood grain) and where the styrene sheets met I glued matchsticks to represent the plank supports...


Once the glue was dry I applied paint and some basing materials and all done...


So the lesson here is chocolates with the right shaped box top are must after diner treats! 😉


Next Time - some new MDF buildings or the scenario details with OOBs for 'The Big Gun' scenario!

Friday, 2 December 2016

Scenery - Building A Statue or Two

Hi All, I need a couple of statues for the FUBAR VSF PULP scenario I'm working on, I had a look in the Dollar Stores and online and decided to make my own, here a couple of typical Victorian English Gentlemen Explorers with the result...


These are easy to make and I had my two ready to go in less than half an hour, here's what I used...
  • A suitable 'statuelike' figure, I think it's a 28mm Elf I trimmed it here and there
  • Some PVC pipe
  • Some thick plastic sheet
  • Black and Grey spray paint


Glue all this together give it an undercoat of Matt Black from a rattle can then mist over that with Grey and you're sorted...


Next Time...I'll negotiate a peace in the Middle East...well not really...

Wednesday, 8 June 2016

Wrought Iron Fencing - 1/56 scale

With my 1/56 village buildings all done and the roads/paving sorted I just need some suitable Victorian town like fencing which can also double as a cemetery fence for my Renedra tombstones. I looked at the various kits/sets of wrought iron fencing available in 1/56 and decided to go with an MDF set from a Polish seller on ebay. The posts are cut into 3mm MDF and the wrought iron sections into 1.5mm MDF. For $20 Aussie dollars including postage I got just under a metre of fencing with a nice gate section. There's a bit of assembly required for the posts and I used a bit of filler on the tops and sides of them to give a bit of texture and hide some of the bigger joints. Once they were done the fence sections fitted nicely into them. I think it's a bit fragile made up as I have in sections so I can change the layout but if glued all the way around to make a fixed structure it would be quite albeit I suspect hard to store!

Here's some pictures of the finished product with my Renedra tombstones but it can be reconfigured as required...


Next time will be a AAR of some FUBAR VSF action...WooHoo!

Thursday, 19 May 2016

The Village of Little Tinkle – Sarissa Buildings


Recently I've been expanding my selection of 1/56 terrain for my growing 28mm 'armies'. After deciding on using Sarissa laser cut MDF buildings I visited Arcane Scenery and Models and bought a selection of kits to create a VSF village...

Village of Little Tinkle

On the banks of the River Wee the sleepy village of Little Tinkle has had an interesting history dating back to the time of the great Norman Invasion of 1066! Founded by a little known Knight Sir Randolph Tinkle its fortunes waxed and waned as the years passed. Randolph was a lover of apples and for the whole of Little Tinkles history an apple orchard thrived in the rich soil on which the village was located adjacent to the Tinkle family residence.  Some even say the apple trees that were finally torn down in the early years of the 20th Century were related to the first ones the great Knight planted himself around a 1000 years earlier!

During its many years the town was inundated several times in Wee (!!!!!). Fires ravaged the buildings more than once and the Great Little Tinkle Fire of 1666 was said to have been lit by a mad decedent of Sir Randolph Tinkle who fiddled as the town folk desperately battled the flames! By the time of the Great Steam Wars of the late 19th century the town was only recently rebuilt after a great conflagration during the 1860s the only surviving structure being Tinkle Farm constructed during the Napoleonic Wars by Captain Tinkle of the 33rd FootnMouth Regiment. Enclosed by a neat picket fence Tinkle Farm stood next to the traditional Apple Orchard and the new Town Square was erected by it. The feature that made Little Tinkle so important during the 1870’s and 1880’s was the great iron bridge spanning the River Wee and bore the village’s name! The sturdy structure christened The little Tinkle Bridge by the local Council was a masterful piece of construction designed by the leading British engineer of the time Brunel, Fred Brunel.

With needs of more pastures the early 20th century saw the river Wee dammed up and filled to create a great alluvial plain on which crops could flourish. The town was demolished and all that remains for visitors today are several historic plaques marking major events that occurred in its history. The famous Little Tinkle Bridge was ignominiously removed when the river bed was filled and it was recycled into metal plates for the hull of the great steam ships that plied the oceans of the world!

The village of Little Tinkle and environs April 1878 after Russian air attacks had damaged several buildings...the long standing Apple Orchard is clearly visible as is the famous Brunel designed bridge over the River Wee...


The village of Little Tinkle consists of:

Sarissa
5 World War Range Buildings
Village Fountain
Box Girder Bridge
Battlefield Accessories
Village 'Farm' Building
Renedra
Picket Fencing
Palisade Fencing

All of these went together with no fit problems using just PVA glue. The rooves of all building are removable and where buildings are two levels the upper one is not glued in place to allow for easy figure placement on the ground floor. They are painted with cheap rattle can enamel paints and with highlights using acrylic paints.

These building designs were chosen as they should look okay for both the VSF and WW II periods as I plan on using them for my WW II 28mm skirmish gaming too. For WW II skirmishing I am looking at a couple of sets of rules; The Two Fat Lardies Troops, Weapons and Tactics and Nordic Weasel Games Five Men at Kursk…

See you next time!