It's been a while but my 'The Russians are Coming Campaign' is back! This is the fifth scenario in the series and it pits both sides against each other in a meeting engagement. Enough said I hope you enjoy the AAR for 'Hills are for Heroes!'...
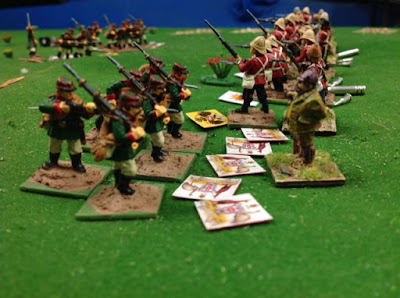
The Russians, led by Staff Officer Captain Pushkin are surprised as they see Colonials loom into view on the 'unoccupied' hill...

The History
Wednesday August 27 1879
Wednesday August 27 1879
Captain Pushkin flipped open the cover of his pocket watch and grimaced, the strain on his face showed as he watched the seconds tick by and noon approach. It was hot, his orders were vague and no attempt had been made to reconnoitre the area surrounding his objective. He was about to step into the unknown! He blew his whistle at exactly noon and his detachment rose as one with him and in open order they moved out toward 'Hill15'.
Lieutenants Murray and Torrens heard a faint whistle in the distance as they ushered their militia from the Norwood and Unley Volunteer Rifles forward. They had been ordered to capture a slight rise known as 'Bill's Hill'. Locals had approached them earlier in the day and had informed them that Ruskies had been seen in the area to the west of the hill that morning. Bearing this in mind they drilled their men on deploying into line from march column several times. The sun was high in the sky and there was no wind, Lieutenant Murray quipped 'Perfect day for a picnic on yon hill me thinks!." Torrens replied with a board smile, "You're an idiot" and with that drew his revolver and they headed off.
The Siberian infantry and Russian seaman trudged forward for what seemed and eternity and as they began to negotiate the gentle slope they were surprised! At the crest of the hill in the brilliant sunlight a line of men in red appeared. The shimmering line of scarlet was then engulfed in smoke and the crack of gunfire abounded. "The Devils Mother!" cursed Pushkin as he heard screams of agony and saw some of his men crumple to the ground. Stunned the Russian troops return fire without awaiting orders. Their shooting was wild and scored no hits on the defenders. Captain Pushkin ordered his second line sections to advance and seek cover whilst screening those that had been shot up. He contemplated his options.
Sergeant Wakefield had always taken pride in his men's musketry prowess and they did him proud as their first volley hit several Russians. He could hear orders from Murray to keep up rapid fire and hold the crest so urged his men on in a booming voice!
Meanwhile as hot lead whizzed all around him Captain Pushkin seized Sergeant Korf by the shoulder and ordered him to flank the the left of the Colonial line. He roared, "Korf the fate of this operation is in your hands, get around these Devil's flank and make your Tsar proud!" He then formed his other three sections into line and prepare to cover Korf's move.
Several South Australians fell to Russian fire after they reorganised while the Colonial's own fire was becoming more ragged. What worried Lieutenants Murray and Torrens was that in just a short time their men had almost expended all of their ammunition, they both hoped their remaining rounds would be sufficient to finish the job...it was at this crucial point they both heard a great 'Huzzah!'. It was clearly audible over the musketry and signaled the Siberians on the Russian right charging the Norwood Volunteers. The militiamen fought fiercely but their well trained opponents were just too much and they suffered a heavy defeat and wavered.
Pushkin seeing the success of the attack by Korf urged his men on but it was too late the Colonials realising the day was not theirs decamped in good order their officers deciding discretion was the better part of valour. The Russians occupied Hill 15.
At 12:45pm silence reigned on Bill's Hill, Pushkin scanned the carnage and ordered an Imperial flag raised immediately he then commanded his men to dig in as these damned Colonials could return!
The AAR
Turns 1, 2 & 3
Both the South Australians and Russians entered the 'field of glory' and made a beeline to the hilltop, the Colonials entered in column formation whereas the Siberians came on in skirmish order. Covering ground more quickly than their opponents the Australians redeployed in line in their second action phase of turn 3 while ascending the hill.


Turn 4
Overall view of the battlefield, the hill well more of a mound really dominates the centre of the tabletop...

The Colonial columns advance!

Deployed in skirmish order Captain Pushkin's men move forward...

Turn 4
The Australians winning the initiative gained the crest line of the hill and opened fire on the Siberian infantry and Russian sailors who were now in plain view. The extreme right section of the Australian line from the Unley Company commanded by Sgt. Wakefield scored an impressive 3 'kills' with their first volley. In response to the accurate Australian fire the Russians moved to take cover allowing them a level better 'protection" (i.e. they hit the dirt) they then fired on the Colonials albeit with little effect. The Russians passed their required moral checks easily.
The two sections of the Norwood Volunteers open up on the advancing Russians...

...they were quickly followed by the boys of the Unley Volunteer Rifles...

After Sgt. Kellers men took losses (bottom left) and they were leap-frogged by fresh men...the advantage of concentrated firepower as a result of the South Australian men being in line against the spread out Siberian infantry and Russian soldiers shows out in the overhead view...

Turn 5
Both sides exchanged volleys with the Russians getting the worst of it, their skirmish formation was not allowing them the same amount of firepower as the Australians in their lines and their casualties mounted. One Siberian section was reduced to less than half strength but with a Staff Officer on the table boosting force morale they passed their own morale roll comfortably.

The battle lines face off...

Turn 6
The Russians changed formation into line allowing them to pour more fire into their enemy and several Colonials were hit. But under pressure the Australians maintained their resolve despite losses and continued their fire taking out even more Russians. All units again survived their morale tests (only just in the case of one of Sgt. Wakefield's Section!). At this point both sides losses were even so victory could go either way.
Captain Pushkin gets his men into lines to contine the firefight on more equal terms...

Korf's section moving to the flank...

Overall view at the end of turn 6.

Again to reduce losses the Russians moved to 'take cover' and reloaded their weapons ready for the final turn. The Australian's fired again but accumulating casualties and a lack of ammunition were reducing the effectiveness of their volleys (they experience several weapons jamming and one even double jammed resulting in no fire for that figure for the rest of the game!).
Sgt.Korf's section right out to the left launch a last turn charge on the Colonials line.....

Turn 8
The South Australian's winning the initiative fired first hitting a couple of the Russian sailors.
In a final throw of the dice the Russians used three units to continue firing whilst their only intact section on their extreme right led by Sergeant Korf charged! The firing was particularly ineffective but their charge against a section of the Norwood Company proved spectacular! The trained Siberians even though at a disadvantage as they were downhill of the Colonials were far superior in the melee inflicting 3 casualties while taking only one loss, this result proved crucial as it gave the Russians a slim victory! Both sides suffered around 30% casualties, all a bit nasty!


Last turn and the Unley Company volunteers continue to stand up to the Siberian Regulars...

The two sides engage in a serious bit of 'biffo' on the left flank of the Colonial's line..


The fight goes in the favour of the Siberians...

Overview at the end of the game...

Victory Calculation;
Russians within 25cm of the objective 23
Russians within 25cm of the objective 23
South Australians within 25cm of the objective 22
So despite their success the Russian aggressors are still trailing in the Campaign score 3 to 2 with two games remaining.
Finally the Russians rolled a 2 for their 'Lieutenant-General Lazarev Heart Attack Roll' so he's still hanging in and there'll be no special morale rules in play for scenario six!
In summary this is a scenario 'idea' I've used many times with different rules in different era games featuring a central objective, a short time limit and a requirement to have as many living figures close to that objective at the games end. It normally ensures a lot of movement and combat. This game was played three times and this AAR is from the first game, the other two were quite boring with both side hovering on their side of the hill and the action occurring only in the last couple of turns. To negate the LOS obstacle, i.e. the hill it will need some tweaking giving one side more 'lesser' troops so there is incentive for the smaller but 'better' side to engage them as they will need to to reduce their numbers significantly for the last turn victory calculation. This will take out the option of both sides loitering until the very last turns.
Next time; hmmm once again I'm not sure...
Great looking game 🙂
ReplyDeleteCheers Matt!
DeleteI enjoyed the report narrative to this closely fought game.
ReplyDeleteThanks Pete!
DeleteInteresting scenario and has uses across a number of periods.
ReplyDeleteCheers
Stu
Cheers Stu!
DeleteGreat report Captain. It looks like Adelaide might be renamed Anastasia!
ReplyDeleteHey Ben, thanks!
DeleteHmmm the Ruskies will need to win the last two games in the Campaign to threaten renaming Adelaide! Next game see the Colonials on the attack trying to recapture the hill!
I've been watching this campaign with great interest and will continue to do so. I'm looking forward to running a similar campaign using The Sword And The Flame for the land battles and Gunboat & Dhow! for the naval battles.
ReplyDeleteCheers,
JB
Thanks JB!
DeleteLook forward to seeing your campaign! Naval battle battles cool, I had thoughts of a game along the banks or on the ‘mighty’ Torrens River but didn’t include them.
Cheers!