Sunday 22 February 2015

The Story of the Steam Powered Armoured Wagon...

The Great Martian Invasion of 1874-1875 accelerated mankinds scientific and industrial development and many new innovations were quickly realised out of necessity to help defeat the Alien aggressors. The story of the Steam Powered Armoured Wagon, known to the soldiers that were deployed with them as SPAWs was typical of the enhanced technological progress:

The story of the Steam Powered Armoured Wagons began in the years following the bloody American Civil War. A young engineer, Stanley Livingstone working for the Pittsburgh Engine Company whose family had several members suffer horrendous injuries during the war believed he had an answer to the deadly effects of the modern firearms soldiers were now equipped with. He envisaged a steel plated wagon powered by a steam engine surmounted with a cannon armed turret. With its metal skin to protect the crew and massive firepower supplied by cannons this new machine could roam the modern battlefield its crew protected and able to deal with any enemy! He imagined a mobile fortress!

Stanley had been fascinated by steam engines in his youth and during the conflict between the North and the South had worked for the Union side on the monitor class of vessels; he became obsessed with their up-to-the-minute design and the novel ideas used to create them. The revolving turret allowed the vessel to fight all round and its steel clad hull offered security to its crew, weaponry and steam power plant. He believed that he could create a functioning ‘land ship’ combining the new technologies of the Monitor vessels and the latest steam engines of the Pittsburgh Engine Company.

Livingstones first sketch of a Steam Powered Armoured Wagon:

Unfortunately the reunited United States of America was war weary and in this environment Stanley’s original idea found no backers. Using his life savings and the experience he had garnered during the war years Stanley created several working steam wagons by placing the Pittsburgh Engine Company’s smallest power plant onto a series of old wagons. He did this to determine the smallest wheelbase he could successfully power yet leaving enough room to add a crew compartment and a turret. Once he had successfully created such a mobile platform he and a blacksmith built a steel box on it. The armour was bolted into place rather than riveted to allow for simple replacement of sections that may become damaged in battle. He then acquired two old cannons from a scrap dealer and mounted them in a circular Monitor style turret on the armoured body; the Steam Powered Armoured Wagon was born.

The only two known surviving design documents drawn by Livingstone:


 The initial trials were just that, trials. The crew battled ongoing problems with the engine, the drive train and the turrets rotation mechanism but after several months the machine was ready to be displayed to the military. Unfortunately even though Stanley demonstrated his now fully functional miracle vehicle to deputations from the armies of all the majors powers none showed any interest, his spirit broken and his pockets emptied Stanley gave up on his dream and started work again with a small engineering firm in Cincinnati. His pride and joy resided in an old barn on the outskirts of the city gathering dust.

The American spring of 1874 saw the arrival on the Earth of the Martians with their infernal tripod fighting machines! These beasts in their protected towers caused mayhem where ever they appeared and even the best the infantry, cavalry and artillery of the world’s armies were outclassed and powerless to fight back against their Martian foes. It was a junior U.S. army officer who remembered Stanley Livingstone and his Steam Powered Armoured Wagon and proposed to his superiors it could be mankind’s answer to the Martian invasion forces tripod machines.

On discovering the U.S. Army’s intentions the Cincinnati Steam Engine Company for whom Stanley then worked as a lowly design engineer quickly garnered all the rights to the design of the Steam Powered Armoured Wagon from Stanley promising him a vice presidency in the company and a rich bonus. Naively Stanley agreed to their terms and the company became a global powerhouse supplying Steam Powered Armoured Wagons to nations around the world. The vehicles were also made under license by several countries. These machines were instrumental in the human race defeating the Alien scourge and ensuring the continuance of mankind.

Stanley Livingstone however was let down by the management of the Cincinnati Steam Engine Company, he never received his vice presidency nor any of his ‘inventors’ bonus. He died before his time a poor and broken John Doe in a doss house in the slums of New York to where he had drifted in the late 1870s
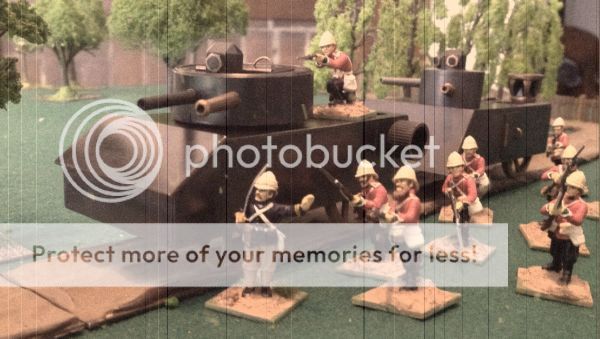
A picture of two Steam Powered Armoured Wagons (a Mk I & a Mk VI) in service with the 3rd Steam Powered Armoured Brigade, of interest is the officer leading these men is the celebrated Captain Darling:

Next Time: the making of a 28mm Steam Powered Armoured Wagon fleet…well really I should do the AAR for the Crossroads scenario of The Russians are Coming Campaign so it will probably be that!!!

Wednesday 18 February 2015

Campaign Game 3 Set Up Details & Special Rules

These are the set up details and special rules for the third of the The Russians Are Coming campaign games. A map of the play area is included. Please feel free to try this yourselves (you may have to adapt it for your rules) and let me know how you go!

The Forces 

Russians two units – Siberians fire & melee as raw
                                  Cossacks fire as raw & melee as trained
                                  Officer is veteran & the NCO is trained

1 Army Officer (Lieutenant Ourumov)
12 Privates
1 Cossack NCO (Sergeant Vargas)
12 Cossacks

South Australians three units – unit one fires as trained & melees as raw
                                                  units two & three fire & melee as raw
                                                  the Officer & two NCOs are veteran

1 Officer (Lieutenant Harry Lime)
9 Privates
1 NCO (Sergeant Mal Fraser)
11 Privates
1 NCO (Sergeant John Kerr)
11 Privates

Deployment

South Australians –     all units enter on turn 1 from anywhere along the east edge
Russians –                  Army unit starts anywhere within 12cms of the barricade
                                   Cossack unit enters anywhere along the west edge on turn 3
Game Length
The game ends after 12 turns then victory conditions are checked
Victory Conditions
At the game end the South Australians must clear the ALL the Russians from the barricade/roadblock to a distance of at least 16cms
Special Rules
  • Turn 1 the South Australians have the ‘initiative’
  • Fire at any target on the board that is to the west of the firer (no matter how slight the angle) incurs a -1 modifier due to the rising sun
  • Cossacks can't use formed line if a units leader is killed they maintain in skirmish order and move at half speed
  • Cossacks may be up to 20cms from their leader
  • The "hills" are actually rolling ground they block line of sight and give those on them melee and shooting advantages but cost no extra movement points to climb as the slopes are gentle
  • The copses and fences are light cover (copses anywhere within and fences if they are anywhere between the firer and target when both are on the same level of elevation) and they do not block line of sight
  • The barricade/roadblock is light cover and blocks line of sight unless the figure is adjacent to it
Below is Captain Darling's map of the crossroads where Henley Beach and Tapleys Hills Roads meet and the surrounding area, the Russian barricade acting as a roadblock is shown. This diagram was thought lost but discovered in a secret pocket in the lining of his travel trunk many years later.

The below Scale and Legend were attached to the Captain's map after the campaign, they were created by someone unknown in later years!

Just a note her on the special rule covering shooting into the sun, for ease of play we went with any shot in a westerly direction no matter how slight the angle was a shot 'into the sun'. It saved the use of protractors and long straight edges, if you play this scenario feel free to change this!

The "historical" AAR will follow soon!

Wednesday 11 February 2015

Campaign Game 3 - The Crossroads

This is the background of the third of the seven scenarios of the Russian Invasion of the Colony of South Australia campaign game:

The sun shone bright as day broke on Friday the 22nd of August 1879 and it promised to be a fine and sunny day over the whole of the Colony of South Australia. The recently decamped Russian force was now ensconced securely within its beachhead based around the city of Henley Beach. Two armoured cruisers and the frigate from the invasion fleet had departed that morning in the darkness to take up station in the Great Australian Bight; it was planned that from there the frigate could dash back to Asia to wire a message to St Petersburg once news was received that complete success had been achieved. These vessels had been cleared for action in case any hostile ships were encountered their orders were to fight to the last for Mother Russia!

Ashore Lieutenant-General Lazarev meanwhile waited until noon before issuing the days operational orders to his units. The morning was spent sifting through intelligence reports and scanning the depressingly long list of men in the makeshift infirmaries on the beach, many soldiers had still not recovered from the infections that had decimated the battalions effective strengths on the cramped passage from Vladivostok.

At 2:00pm precisely the two monitors Admiral Spiridov and Admiral Chichagov started a bombardment of the city of Adelaide and the supposed positions of the South Australian militia units with their 9 inch main batteries. Huge fountains of dirt spiraled skyward indicating each massive shell arriving at its target. Despite the noise and impressive explosions the shelling caused no significant damage to either the city or the defenders and when it's ceased after a brief five minutes an eerie silence replaced the raucous din of action.

Just after 4:00pm in the afternoon the Russians launched company strength incursions from their beachhead toward the city and also Port Adelaide. These probes had the dual purpose of testing the defenses and securing important locations from which the main assaults would be launched. Some ‘high’ ground, really nothing more than high points on the rolling plains and several crucial crossroads were included in these objectives.

One of these intersections was where Henley Beach and Tapleys Hill Roads met and Russians led by Lieutenant Ourumov of the East Siberian combined battalion with Cossack scouts attached occupied the position meeting no resistance. Ourumov immediately ordered his troops to fortify the location. A hasty roadblock was created using the materials at hand and as night fell the Russians settled in as best they could.

This day for the first time since the Russians had arrived Lieutenant-Colonel Downes was caught out, he had spent the day busily organizing the volunteer rifle companies as they continued to concentrate in the parks near Adelaide’s West Terrace. He wished to defend the city along the line of Tapleys Hill Road so was dismayed in the evening when he was told the Russians had already breeched this line where Henley Beach Road crossed it.

That night Downes and his staff planned to recapture the crossroads so the defense line could be established as envisaged. Staff Officer Captain Darling personally ensured the Norwood Volunteer Rifle Company was deployed for a dawn attack and he impressed upon them the importance of their objective which was in Lieutenant-Colonel Downes very own  words to ‘drive the Russians back toward the coast and clear of Tapleys Hill Road’. The men from Norwood were eager for a fight and the tension was palpable when Lieutenant Harry Lime gave his men the order to attack, the ‘Huzzahs’ and crack of Martini-Henry fire signaled to all 'it was on'...
  

AAR and scenario forces, set up, special rules and victory conditions to come!

Saturday 7 February 2015

A Ramble on Rules...

Well now for a ramble on the rules selected for ‘The Russians Are Coming’ Campaign, I should probably have done this much earlier but better late than never…
I hope this gives you an idea of how these games are being played and why some events may occur during the AAR’s.
An ‘in depth’ search on the net for recommendations and reviews of suitable skirmish level late 19th Century rules sets was carried out. The good news is there are quite a few such sets of rules available for this period which led to the bad news of how to select one!
The considerations taken into account when selecting a set of rules were it:
  • can cover up to a maximum of 100 men (figures) per side
  • includes at least a semblance of command control rules
  • includes morale rules
  • uses a minimum of tables/charts
  • has a relatively fast play time
  • and most importantly be easily to learn and teach
After researching almost a dozen sets of rules the short list included:
  1. Colonial Skirmish Rules – Richard Bradley
  2. Front Rank Fire – J Wallman
  3. Smooth and Rifled – Dadi & Piombo
  4. The Sword and the Flame – Larry Brom
All of these sets of rules had both advantages and disadvantages but the standout was Smooth and Rifled with its period supplement. That being said in the end it was decided to adapt the ACW skirmish rules that we currently use, ’A State of War’ by Richard Bradley. This set of rules is simple yet very effective for playing ACW skirmish games so it was decided it was worth tweaking them for use for 1879 Oceania. This meant we would only need to learn one set of rules to cover the two periods! I kept in contact with Richard Bradley while making the updates required and he was very helpful first up letting me make the changes and secondly giving me feedback on the alterations.
In truly boring style the revised rules were titled ‘A Colony at War’, actually we had about five names some of which were ‘out there’ but we held a draw and this one won.


Here’s a summary of how ‘a Colony at War’ works!
Game Rules
These rules take up only a half dozen pages.
No ground or time scales are stated and one figure represents one man.
The base unit is a section with up to 12 figures each with a commander (exceptions allowed).
There are rules for cavalry and early machine guns.
There are listings of soldier and weapon costs in points.
Turn sequence includes both sides rolling for initiative and once that is determined it is “I go you go” with each player getting two action phases per turn followed by a morale phase (there is a possibility of ‘opportunity fire’ by the passive player).
Basic actions are move/charge, fire, change weapon etc. Fit figures get two actions a turn wounded figures get one action.
To be in command a figure must be within 16cms of the sections commander.
Unit commander casualties are not replaced and for the duration of the game that unit is ‘handicapped’.
The central mechanic of the game is different classes of troops (four in total) use dice with differing numbers of sides covering troop quality for actions. For example a veteran soldier rolls a 12 sided dice versus a lowly civilian recruit rolling a 6 sided one thereby giving a much better chance of higher roll results to the better soldier.
Movement is a fixed allowance per action with terrain penalties.
For shooting the firing figure rolls one die determined by their class and the defending figure rolls two one for range from firer and one for cover type, the total for defender is taken off the firers roll a negative result is a miss a positive result is a hit a high difference kills a low difference is just a graze. Casualty allocation is by random die rolls.
Melee is dicing per figures involved with modifiers, the highest roll wins and the higher the roll the better the win, results range from ‘pushed back’ to ’death’. A tie results the melee continuing into the next Action Phase.
Morale is pretty traditional where a modified die roll (there is a short list of modifiers) is looked up on a chart and results followed.
To keep the basic rules as clean as possible individual scenarios include special rules covering any specific circumstances that may occur in that scenario.
At this period despite the growing effectiveness of firearms ‘line’ formations were still is use by countries, these are not the strict and rigid Napoleonic type lines but still men fought in close formation. This formation is naturally slower than the skirmish order but there are benefits for having your men in ‘line’, they get:
  • a morale bonus
  • a melee bonus
  • a fire bonus – the second rank may always fire whereas in skirmish order a minimum gap is required to shoot between friendly troops
  • a casualty allocation bonus – any figure in skirmish order of a unit may become a casualty whereas in line only the front rank takes casualties, your Officers and NCOs can be 100% safe in the rear of such a formation
There are circumstances of weapons jamming in the rules this is a generic term covering not only jams, but everything from a soldier fumbling to open a new ammo pouch to one who is just slow to reload for this shot. The extension of a jam being no fire (two jam rolls in a row) more probably represents a soldier running out of ammunition than a devastating failure of his weapon but that is of course possible. In the game such a figure can replace his weapon or pick up more ammunition by moving to the spot of a fallen comrade and spending an action phase stationary there.
Campaign Rules
There are seven scenarios in The Russians are Coming Campaign and the nationality with most wins after all seven have been played wins the campaign.
The Hero/Staff Officer rules allow both sides on any two scenarios within the campaign to replace one officer in their order of battle with either a Hero or Staff Officer. This figure then assumes actual command of the section of the commander they replace but is more than that they are a figurehead for all the units in the order of battle. Any unit with a line of sight to either the Hero or Staff Officer gets a bonus boost to their morale. Conversely if a Hero or Staff Officer is killed then all units must take a morale check at the next morale phase (even without a line of sight to the Hero or Staff Officer as such an event would soon be known in the ranks). This morale check has a large negative modifier and for any further morale checks required for the balance of the game there is an smaller negative modifier.
Lieutenant-General Lazarev actually died of a heart attack in late 1879 so from the third scenario onward the Russian player rolls a 6 sided die before the start of each game to determine if Lazarev has suffered his fatal heart attack at that point of the campaign.
  • Scenario 3 - 6 result
  • Scenario 4 - 5,6 result
  • Scenario 5 - 5,6 result
  • Scenario 6 - 5,6 result
  • Scenario 7 - 4,5,6 result
For just the scenario coinciding with Lieutenant-General Lazarev’s heart attack a second 6 sided die is rolled with the below effect:
  • 1,2,3 result the army is demoralised for this scenario only -1 extra from all morale rolls
  • 4,5,6 result the army is enraged and for this scenario only +1 extra from all morale rolls
Also once Lieutenant-General Lazarev suffers his heart attack any unused Staff Officer substitutions are lost.
The End! Ramble over...
Richard Bradley’s rules are available at the Tyneside Wargames Club Site on the Download Page: http://tynesidewargames.co.uk/

Next time: Back to the Russian Are Coming Campaign!

Sunday 1 February 2015

The Great Silver Bullet Scandal!

Over the years many writers and private detectives have followed up the intriguing police report from August 1879 concerning the case of the ‘Great Silver Bullet Scandal’ and most have tried to link Captain Edward Darling to it. No one has so far been able to definitively resolve this mysterious case or bring to light conclusive evidence that the good Captain was involved in any way…

Tuesday morning August 18 the Adelaide East End Market found one particular hawker of goods doing extremely good business. He was a shabby looking fellow in a tired suit, his stance was slightly stooped, he had a bushy beard, glasses and a workers cap pulled down low over his brow. Before him and of great interest to a large crowd of customers including many militiamen he had an open travelling trunk its exterior was covered with travel stickers from all over the world and his name was clearly displayed on a brass plate, Dr W. Van Der Groot. Within the trunks worn stripped lining were literally hundreds of cartridges to fit a variety of weapons but most were for the famed Martini Henry rifle. Now none of this looked too out of the ordinary but on close inspection these cartridges were special and the crudely hand written sign wedged in the open trunk lid pronounced to buyers in large letters ‘Silver Bullets!’ with the following in a smaller scrawl below it ‘For the purpose of killing Cossacks!’.

The arrival of the Russian invasion force at Henley Beach the previous Sunday and the spreading of a rumour over the ensuing days to the effect, ‘that the Cossacks are beasts that can only be felled with the use of silver bullets’ made Dr. Van Der Groots presence at the market with a trunk of bullets with silver projectiles a god send to the defenders of the Colony of South Australia! Not surprisingly the Doctors business was brisk; his trunk was empty and his pockets full well before noon. As soon as he had sold out of cartridges he packed up his trunk and to the entreaties of those still queuing up to buy his wares as to when he would be back with more stock he replied in a guttural South African accent, “I am Groot…”

Next morning at the very spot of the Adelaide East End Market where the Doctor was peddling his wares a large crowd of men were asking all and sunder where Van Der Groot could be found. Some of them wanted to buy his miracle silver bullets others were ready to string him up from the nearest tree as they had found to their dismay the previous night when they eagerly polished their new silver bullets for use against the next devilish Cossack they crossed paths with that the projectiles were merely lead coated with silver paint! The whole business was a swindle!

The local Constabulary was immediately informed of the misdemeanor and an investigation was begun in earnest but no sign of Dr. Van Der Groot was ever found nor was any record of such a man ever located.

Lieutenant-Colonel Downes on hearing of this outrage issued an instruction to all officers to impress upon the rank and file that the malicious rumour stating ‘that the Cossacks are beasts and can only be felled with the use of silver bullets’ was completely false and no credence should be placed in it. An order was issued that the men of the Colony’s defence force were forbidden to buy cartridges for their weapons and were to only use munitions supplied through official channels!

An odd story indeed but you may ask how Captain Darling could be linked with this shameful activity in any way well…

Local Detectives investigating the case of the ‘Great Silver Bullet Scandal’ were supplied with some interesting ‘anecdotes’ during the extensive interviews the conducted. There was never enough evidence to arrest anyone over the fraud. They pieced together the below ‘facts’ which they believed related Captain Darling to the case:
  • The rumour regarding the Cossacks and silver bullets was found to have originated in an east end bordello that was often frequented by Captain Darling
  • Captain Darling owned a trunk that in all but the name plate ‘Dr W. Van Der Groot’ matched the perpetrators one
  • Captain Darling had easy access to munitions from the defence forces stores
  • Captain was a master of disguise a trait he pick up on the Dark Continent
  • Captain Darling had travelled extensively and would be fluent speaking with a Boer accent
  • Captain Darling was known to be artistic and had a penchant for painting crude female nudes so had ample supplies of painting equipment
  • Captain Darling was sighted gambling during the evening of Tuesday August 18 in the cities East End at a licenced drinking establishment brandishing a large wad of notes
No witnesses however linked the police sketch of Captain Darling with the bearded, bespectacled and capped Dr Van Der Groot and he also had an alibi of sorts, he was on a lone top secret mission for Lieutenant-Colonel Downes scouting the positions of the invading Russian army at the time! This meant of course he had no actual witnesses but his sketches of the enemy’s dispositions meant the scouting had been carried out at the same time as Van Der Groot was committing his unscrupulous offence! Many believe Darling’s reconnaissance was carried out overnight allowing him time to be at the East End Markets during the period of Van Der Groot’s presence but that could never be proved and others seriously believed after hearing tales of his enigmatic adventures on the Dark Continent he could have achieve both activities at once, this Dear Reader I’ll leave for you to decide!

Next time back to the 28mm Scale Campaign Game!