Hello! Yes I'm still here just been very busy with real life stuff and some 'other era' gaming!
Back to my favourite gaming genre though, VSF. A couple of unrelated things came together recently; my admiration for the ill fated Imperial Russian 'Tsar Tank' and my liking of Miniature Scenery's products...yes Miniature Scenery have produced a 1/56 scale flat pack Tsar Tank, oh yeah!
The Tsar Tank!

Image from Wikipedia...
I won't bore you with the full story of this behemoth (a quick net search can give you that) but it turned out to be an expensive failure. I do say failure but it may not be the best word for it, in 1915 when it was built Armoured Fighting Vehicles were in there infancy and many prototypes got even less further than this so I look upon it as a step in the development of AFV's.
Her's how the actual prototype Tsar Tank shaped up...
Dimensions: approximately 18m x 9m x 12 m
Weight: approximately 60 tons
Crew: estimated at 10 - 12
Road Speed: 17 KPH
Armament: several Cannons and HMG's in 2 turrets and 2 sponsons
Here's the size of the kit from Miniature Scenery...
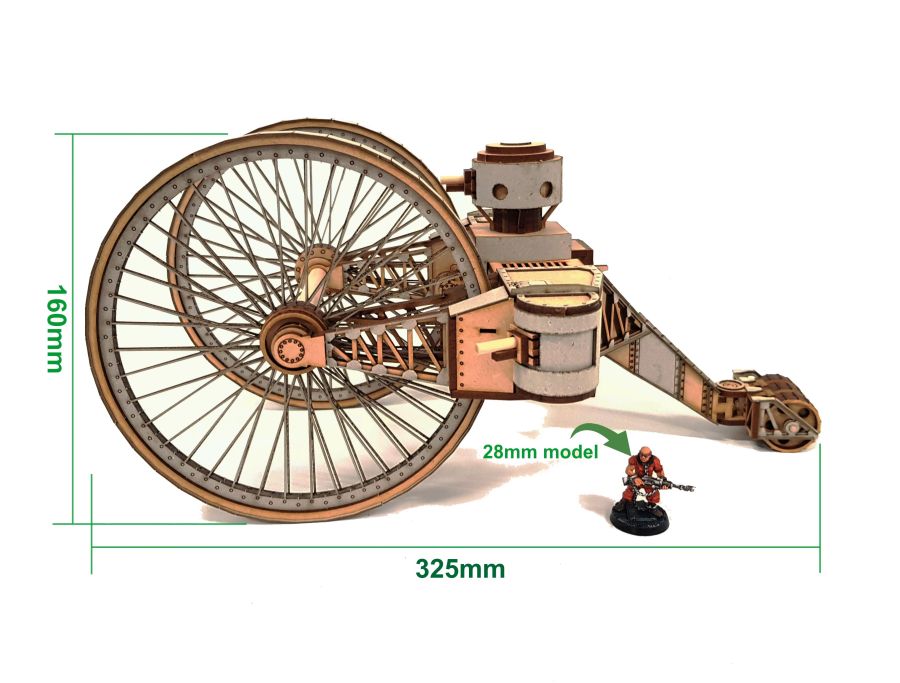
Image from Miniature Scenery...
Links for the kit...
Miniature Scenery
Tsar Tank
So to my Tsar Tank, I'll be using it in my VSF games obviously as part of the Imperial Russian army but I'm also hoping it will give my Martian Tripods a run for their money! Not sure what I'll call it or of the 'creation' fluff but I'll get onto that later (the real story is so cool I may go with that but with a different Tsar!).
I plan to build this directly from the kit (there are some optional 3D printed parts but won't use those) except for in two places; I'll add a dome to the top of the upper turret instead of using the kit parts and I'll make some 'pads/tracks' for the front wheels.
The parts, they are well cut in MDF and thick card.There are also three pieces of dowel for axles/gun barrels. The design of the pieces is very clever and minimises any chance of mixing them up by allocating the tabs cleverly (nothing is foolproof though I'm evidence of that!).


Oh and I like the attention to detail in the packaging, the whole pack is designed with a hanger for shops included in the laser cut design (on all of the Twisted range of kits I've had too from them) very cool inclusion...

The assembly instructions are a download and when (if) printed are 36 pages long! There are 96 steps to follow but with optional armaments and upper turrets not all will be followed. They are clear but could have a little more descriptive text (I still managed to make a stuff up while constructing the bicycle wheels but thankfully it's not an issue!).
Here's what I've done so far which are covered by steps 1 to 24 and 65 to 72.
The main hull frame constructed...

Adding the sponsons and starting to 'clad' the frame...
Note the cannons for the sponsons are made from 9 parts (MDF & card) and go together well one can be seen lower right in the picture...

Test fitting cladding...

Test fitting the bicycle wheels, the spoke parts are designed in pairs and you see the criss cross pattern here...

The finished bicycle wheels in 'heritage' green and brass, note I've mixed up the spoke parts they still look fine and we're talking VSF here so I'm not fussed...

I don't usually like covering my builds in multiple posts but in this case because I'm excited to get it out there I will!
Next Time; more on building the Tsar Tank...or maybe something on 'Toy Soldiers'
A wonderful piece of kit! It will look excellent on the table and is the sort of thing you would expect Dr Evil to drive to the shops in.
ReplyDeleteCheers Ben!
DeleteI actually have in the pipeline a vehicle for Dr Von Hades shopping runs...
😄
Wow what a great bit of kit...
ReplyDeleteA great addition to the tabletop.
Cheers
Stu
Thanks Stu!
DeleteShould be a fair challenge for a Martian Fighting Machine methinks!
Sooooo utterly useless it is brilliant. And a very good build. Thanks for sharing
ReplyDeleteWill look spectacular on table. Were the spokes hard to cut out?
Thanks for checking out the blog Prof!
DeleteThe spokes are cut into thick card and the inserts literally feel out no damage to the them at all. They did leave a little 'tab' from each insert on the outer rim that I filed smooth (40 per segment!).
Cheers! 🍺
Want to know a secret? We had to put tabs in the wheels because if we didn't the laser would blow all the tiny bits of cardboard around inside the machine causing mis-cuts at best or fires at worse. We had several mis-cuts in testing due to errant cardboard bits so we didn't have a choice.
DeleteHello, thanks for the info!
DeleteNot knowing much about laser cutting can cut 'pages' of card be feed back through and cut again from the reverse side?
Cheers!
The laser cutter works by putting down one large sheet of cardboard or MDF (In this case about 4ft wide) and moving the cutting head around following the vector lines. There is no reverse side cutting and its all cut in one go. A vacuum table sucks away any small amount of smoke and ir pressure from above keeps the laser head clear of anything getting to where it shouldn't be but that can create issues with blowing lighter bits of cardboard around.
DeleteHope that helps.
Thanks, help me understand how it works!
Delete